
Next up in the sew your own wardrobe challenge is one of my favorite things to sew, skirts. They really are one of my favorite things to draft and sew. They are quick, easy and can be adapted easily into several different styles. From work to play, a skirt can be just as comfortable as your favorite jeans or leggings.
I’m currently working on a skirt pattern and a skirt block that I’ll offer in our online shop but I wanted to also show you just how easy it is to create your own. Once we get our sloper (basic shell) made I’ll show you how to turn that into several different patterns that we’ll then sew up!
Drafting Supplies
Before you get started you’ll need to grab your drafting tools – butcher block paper, craft/drafting paper, or even paper bags opened up will work, a pencil, and a ruler, preferably a clear one (here’s an affiliate link to the one I use). If you have no desire to draft your own skirt but want to learn to sew one don’t worry when we start the videos on sewing the skirt I’ll have a pattern for you to download and use and a Simplicity pattern number that is similar if you prefer store-bought patterns.
Measurements
Taking accurate body measurements is one of the keys to a great fit. Whether you choose to use a commercial pattern or draft it from measurements, having accurate measurements is critical to ensure the success of your final garment. If you need a refresher hop on over and read: How to Take Accurate Body Measurements For Sewing
Measurements Needed:
We will be creating several different skirts from this sloper therefore we need to get all the measurements listed below.
- Natural Waist: Industry standard is 1/4″ above the belly button.
- Lowered Waist: 2-3″ down from natural waist. This is where you typically like your waistline to be. I usually go 2″ down.
- Waist-to-Hip: This is a vertical measurement from your waist to your hip.
- Hips: Measure at the widest part of the hips.
- High-Hip: Measure 4.5″ down from the natural waist and then the circumference.
- Low-Hip: Measure 8.5″ down from the natural waist and then the circumference.
- Length of skirt: Measure the overall length of the skirt on the outer leg. Start from the waist (or a bit lower if you prefer lower rise) and measure down as long as you want the skirt to finish. The industry standard for a skirt sloper is 20″ from the natural waist.
- Waist-to-Middle Knee: Measure from lowered waist to the middle of the knee.
Now that you’ve taken your measurements and recorded them we need to make a few adjustments since we are working in quarters we divide by four.
WAIST: ______
HIPS: ______ ÷ 4 = ______
WAIST TO HIP: ______
WAIST TO LENGTH: ______
Finally, we’re ready to move on to drafting the sloper.
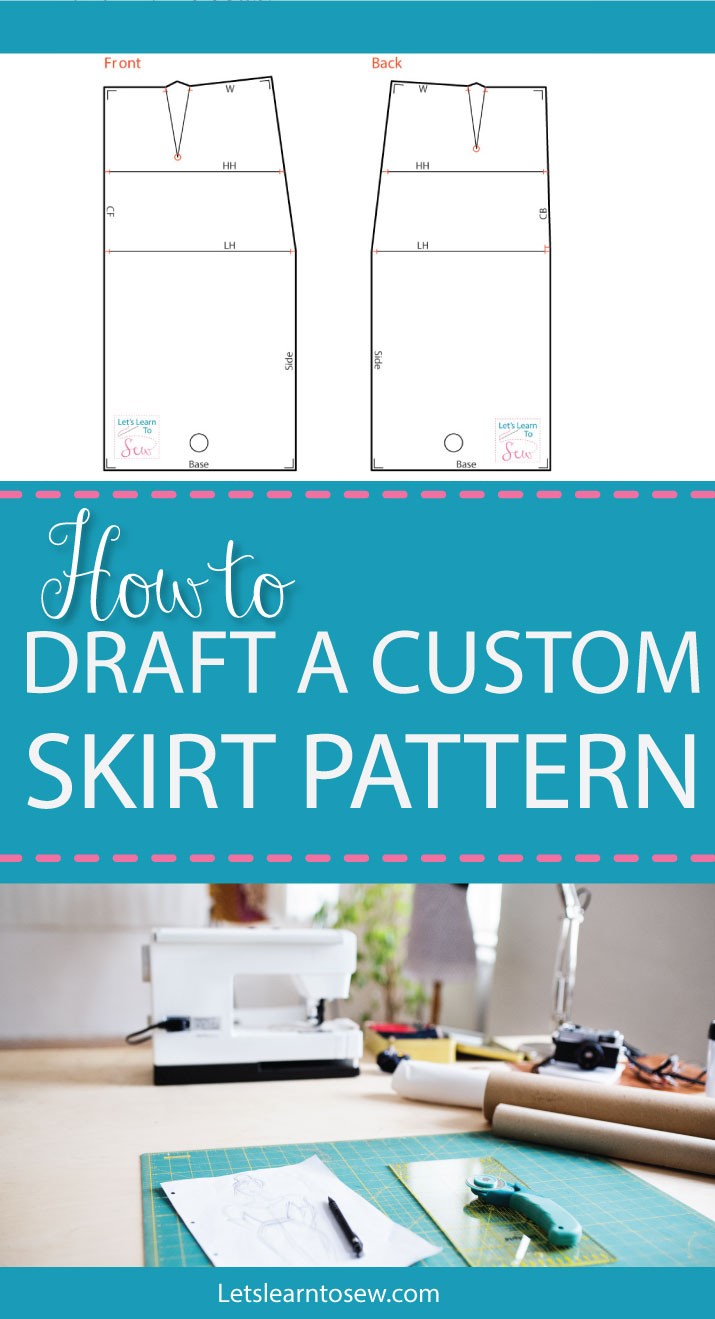
Front of Skirt
-
Prepare Your Paper
Begin with a piece of paper about 6″ longer than your skirt length. Make sure at least one of the sides of your paper is perfectly straight. All of the draftings will from the straight edge so if you don’t have one, draw one with your ruler. This straight edge should be to your left. This edge will become center front (CF) on your skirt.
-
Plot the Length
Along the left-side edge, make a small cross mark 2″ down from the top edge of the paper. From this point, measure down the length of your skirt and make another mark there. Label these points A to B. This line is your center fold (CF). I like to label my lines as I go and include the measurement.
-
Plot the Hip
From “A” Draw a horizontal line using your 1/4 hip measurement. Mark as “C”
- Measure down your waist to hip measurement and mark. Draw a horizontal line
using your 1/4 hip measurement. - From “B” Draw a horizontal line using your 1/4 hip measurement
- Close Rectangle
FRONT DART
1. Measure in 4” from CF and Mark
2. Measure down 3.5” and make a line
3. Measure out 1/2” on each side of line at the top (this creates a 1” dart)
4. Create dart linesBefore we can mark our 1/4” waist measurement we need to account for the amount we are taking in with our darts so we have to do a little math.WAIST MEASUREMENT
WAIST + 1” (for front dart) + 2” (for the back darts) = ______ ÷ 4 = ______Plot Waist
1. Measure out your 1/4 waist measurement on line A towards line C and mark.
2. Measure up at the mark 1/2” and mark
3. Using your french curve create a smooth curve from the new waist mark to line A
4. Using your french curve join new waist mark to hip at side seam
5. Pinch dart legs toward CF (center front) trace with wheel and mark
Back of Skirt
- Measure out length and mark A to B
- Mark center back (CB)
- From “A” Draw a horizontal line using your 1/4 hip measurement. Mark as “C”
- Measure down your waist to hip measurement and mark. Draw a horizontal line using your 1/4 hip measurement.
- From “B” Draw a horizontal line using your 1/4 hip measurement
- Close Rectangle
- At center back measure down 6” and make a mark (this is the zipper stop line)
BACK DARTS
1. Measure in 2 3/4” from CB (center back) and Mark
2. Measure down 5.5” and make a line
3. Measure out 1/2” on either side of line
4. Create dart lines same as front
5. Measure out 1 1/4” and create a new mark
6. Measure out 1/2” from that line and mark then again another 1/2” and mark
7. Measure down 3.5” from center mark and create dart legs
Plot Waist
1. Measure out your 1/4 waist measurement on line A towards line C and mark.
2. Measure up at the mark 1/2” and mark
3. Using your french curve create a smooth curve from the new waist mark to line A
4. Using your french curve join new waist mark to hip at side seam
5. Pinch dart legs toward CB (center back) trace with wheel and mark
-
Label Your Pattern Pieces
Labeling your pieces is crucial! You need to include the date, your measurements, grain line, fold line, sewing instructions, and any details that you want to remember the next time you use this sloper.
You’re done! You’ve just made a skirt sloper/pattern! Obviously, we have some work to do on this before we try to sew up a skirt. At this point, we don’t even have a waistband or closure method chosen. This is just a sloper, it’s not meant to have any of that. This will be the foundation for all the other skirts I’m going to show you. From here on out all, you shouldn’t have to do a lot of measuring and drafting. Once you get a set of basic slopers they will really save you time!
Did I leave anything out? Do you have any questions?
Next, I’ll show you how to add in your seam allowance. Once you add in the seam allowance it is technically no longer considered a sloper/block. if you want to get a head start go ahead and make a copy of your front and back sloper pieces but don’t cut it out.


I have never sewn anything major, but I’d love to try to make a skirt! This post makes it sound so much easier than I imagined!
I’ve never sewn my own clothes from scratch before. My grandmother has done a few projects, especially when I was little. I would love to start trying to make some of my own clothes in the future…I just need a sewing machine!
I seriously want to learn how to sew. Your instructions are super clear. But I’m still nervous!
I always wanted to try to make my own clothing after seeing Project Runway. Now I can try thanks to this tutorial!
I want to attempt to make a skirt one day, this is a great guide! I am going to bookmark this for later!
I wish I knew how to sew. I can’t even mend something! THis is such a good tutorial!
Although I have never done it before, I’d love to learn how to sew. This is a great website for it. 🙂
My daughter would be interested in this as she loves fashion . I’m sure she would love to be able to create her own skirt.
Oooo now this is definitely something I have never attempted! It would be fun to make my very own skirt though!!!
Hay Margaret Smith,
How are you?I was researching about sewing supplies and tools today and your website poped up.
Link:https://letslearntosew.com/resources/
Great staff.Thanks
Anyway, have a great day.
Regards
Kaile
I’ve already started, so eager to learn. From kenya
goodmorning thank very much for this great guide for sewing a skirt i thing though cant you do it in a video.