If you’re new to sewing, hand-stitching is a great place to start. The ladder stitch (also known as the slip stitch or invisible stitch) is an essential sewing stitch. It’s typically used to patch holes in items made of stuffing, such as stuffed animals, pillows, or down coats. This video breaks down the step-by-step process for sewing a ladder stitch.
I don’t know what I’d do without my sewing machine. It helps me zip through projects that would otherwise take days if I had to hand-sew them all. But what if I told you there were some things your sewing machine can’t do (gasp!)?
When it comes to mending and finishing projects in a professional fashion, sometimes you just have to take it old-school and pull out that hand-stitching needle. The ladder stitch is a key skill to have in your back pocket. Below, I’m outlining what a ladder stitch is, the best time to use this stitch, how to actually do a ladder stitch, and a list of free projects where you can practice this new skill.

What is a ladder stitch?
The ladder stitch, also called the slip stitch or invisible stitch, joins two pieces of fabric. I like the ladder stitch because it looks like a ladder as you sew. This stitch is essential for mending and finishing seams.
When is the best time to use a ladder stitch?
It’s typically used to patch holes in stuffed items, such as stuffed animals, pillows, or down coats. If you have a dog who rips through stuffed toys like mine, knowing this stitch is a must. It can save your wallet from buying new toys every other day.
How to do a ladder stitch?
Supplies:
You will need your basic sewing tools:
- -Your Project (Throw Pillow Insert, Pattern Weights, Seamless Scrunchies, etc.)
- -Pins
- -Thread
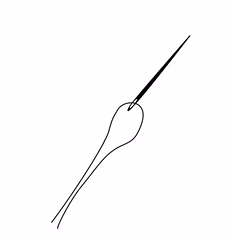
- –Hand Stitching Needle
- -Sewing Scissors
Steps:

1) Press seam allowances toward the wrong side of your project.

2) Pin the opening closed with pins placed parallel to the seam.
3) Thread the needle and bring the two ends together. This creates a double layer of thread for a stronger stitch.
-Tie a knot by wrapping the thread around your finger and pulling the ends through the loop.
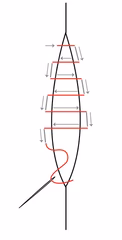
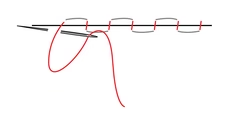
4) To begin sewing, start from the inside of the pillow. This ensures the knot stays hidden. You’ll want to start close to where the previous stitching left off. Insert the needle into the fabric across from where the knot is hidden, taking about a 1/4″ stitch along the fabric fold. That will make a straight stitch across from where you previously stitched. Next, you’ll insert the needle on the opposite side of the fabric, directly across from where the needle just came through. Take another 1/4″ stitch along the fabric fold. Continue stitching until you reach the end of the opening.
5) Tug the thread gently so stitches disappear.
6) To finish, take a stitch, insert the needle through the loop, and pull tight. Repeat twice to secure.
7) Push the needle through the knot, out another part of the pillow, to hide the knot and tails.
8) Cut the thread and trim any visible loose ends for a clean finish.
Looking for projects to practice the ladder stitch on? Check out the projects below:


I would like to join your group. I love to learn short-cuts
Come join in the fun! https://www.facebook.com/groups/letslearntosewsupport