Knowing the basic parts of your machine and how they work is an essential part of sewing. It enables you to use your machine properly and makes troubleshooting easier when problems do arise.
I have labeled most of the important parts of the machine on the image above. Below you will find a brief description of the part’s function.
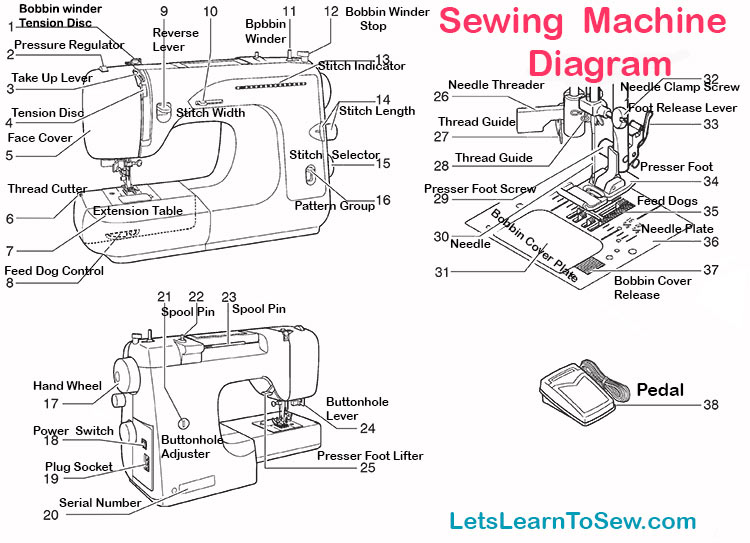
1. Bobbin winder tension disc: Applies tension to the thread for the bobbin winding
2. Pressure regulator: Regulates the pressure applied by the presser foot. This is not something you normally have to adjust in your everyday sewing.
3. Thread take-up: Its up-and-down motion feeds the thread to the needle and tightens the loop formed by the shuttle.
4. Thread tension control: Controls the portioning of the thread
5. Face cover: Covers the light and inside working of the machine.
6. Thread cutter: A small knife that cuts the thread tails.
7. Extension table: A table that can removed or added to give extra room and support to the item being sewn. It s often removed for uffs and small items.
8. Feed dog control: Allows you to raise or lower your feed dogs.
9. Reverse stitch lever: The lever that is held down to initiate and complete a back-stitch or sew backward.
10. Stitch width control: Allows you to control the width of a stitch.
11. Bobbin winder shaft: Where you place your bobbin to add thread to it.
12. Bobbin winder stop: Prevents the bobbin from overwinding.
13. Stitch indicator: Displays the current stitch selected.
14. Stitch length control: Allows you to adjust the length of your stitches.
15. Stitch selector: Allows you to choose the stitch you want to use, such as straight, zig-zag, or blind-hem.
16. Super pattern group selector: Allows you to change the pattern groups.
17. Hand wheel: The hand wheel allows you to manually cause the feed dogs to move and the needle to go up or down. This is often used when pivoting at corners.
18. Power/light switch: Turns the light off or on. Controls electrical current to the machine.
19. Plug socket: Where you plug in the power cord and foot control.
20. Identification plate: The machine’s personal identification number.
21. Buttonhole stitch adjuster: Allows you to adjust the stitching on a buttonhole.
22. Retractable spool pin: A pin the holds the thread and can lowered or raised.
23. Horizontal spool pin: The spool pin the holds your thread when sewing.
24. Buttonhole lever: This will act as the sensor to tell your machine to turn around when the lever hits the plastic guide. That way your buttonhole will be the right size for your button.
25. Presser foot lifter: Lifts the presser foot.
26. Automatic needle threader: A pull-down lever that threads the eye of your sewing machine needle for you. How To Use An Automatic Needle Threader.
27. Thread guide: A guide that keeps the thread on the right path.
28. Thread guide: A guide that keeps the thread on the right path.
29. Presser foot screw: This screw holds the presser foot onto the machine’s shank. Some attachments, such as the ruffler, require you to remove the presser foot before attaching.
30. Needle: The needle takes the upper thread down through the fabric and into the bobbin housing, creating a stitch. Choosing the correct needle is important. How to Choose the Correct Sewing Machine Needle

31. Bobbin cover plate: The plate the covers the bobbin and bobbin housing. The plate prevents the bobbin from popping out while moving.
32. Needle clamp screw: Holds the needle in place. Tightening or loosing it will release or secure teh needle.
33. Foot release lever: A small lever on the back of the ankle of the presser foot that releases the foot. This allows you to change out your feet.
34. Presser foot: Feet that when attached to the machine allow you to do different techniques. Such as, ruffler, gathering foot, blind-hem foot or 1/4″ piecing foot.
35. Feed dogs: A set of metal teeth that grab the fabric and feed it
36. Needle plate/Stitch Plate: The flat metal piece below the presser foot. It has opening for the feed-dogs, measurement markings for your seam allowance, and an opening for the needle to pass down into the bobbin housing. The stitch plate is removable to allow you to clean out the lint.
37. Bobbin cover release button: The release catch that allows the bobbin cover to be removed or closed into place.
38. Foot control: Just like the pedal in your car, your sewing machine pedal allows you to control the speed at which your machine operates. The harder you push down, the faster the machine will go. Remember, just like in a car, the faster you go, the harder it is to control.
Your owner’s manual usually includes a diagram of your machine and sometimes a description. I suggest keeping your owner’s manual near your machine or at least where it is accessible while you are learning to sew.
Are there any parts on your machine that give you trouble or you are unsure about? Please feel free to leave questions or comments.


I never heard about this. It’s my first time that I read about it and it has great. In this post, you had described it very well. I’m sure gonna try it.
It is my first time to read this, and I am great and hope will help me to continue, since sewing is my career. Thank you.