
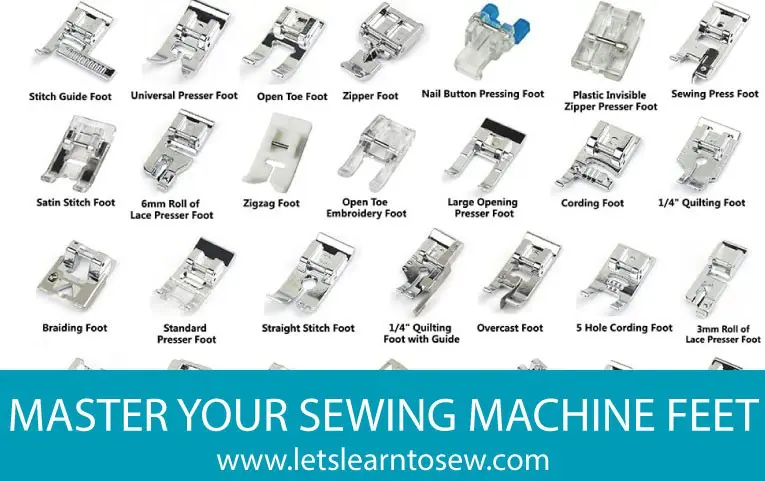
Do you have a drawer full of sewing machine feet and no idea what half of them actually do? You’re definitely not alone — most sewists, beginner and experienced alike, have a box of mystery attachments they’ve never used.
The truth is, changing your presser foot is one of the simplest ways to get more out of your sewing machine. The right foot can make a technique that feels fiddly and frustrating suddenly feel easy — whether that’s a perfectly invisible zipper, an even gathered ruffle, or a hem so clean it looks store-bought.
This guide walks through the presser feet you’re most likely to have (or want), what each one is actually for, and includes a quick-reference chart so you can find the right foot fast, without digging through your manual.
💡 New to your machine altogether? Start with my Getting to Know Your Sewing Machine: Parts and Functions guide before diving into feet and attachments.
Before You Buy a New Foot: Know Your Shank Type
Not every presser foot fits every machine. Before purchasing feet — whether from your machine’s manufacturer or a third-party brand — you’ll need to know what type of shank your sewing machine has.
There are three main shank types:
- Low shank — the most common on home sewing machines
- High shank — common on some quilting and heavy-duty machines
- Slant shank — found on certain vintage and specific machine models
Check your machine’s manual, or look up your model on the manufacturer’s website, to confirm your shank type before buying feet. Keep in mind that many reputable after-market brands make feet that work well across multiple machines and are often more affordable than brand-name feet — just make sure the shank type matches.
Note: This guide covers home sewing machines. Industrial machines use different feet and attachment systems, which aren’t covered here.
Sewing Machine Feet Chart: Quick Reference
Not sure which foot does what? Use this chart to find the right foot for your next project, then click through to the full tutorial for step-by-step instructions.
| Foot | Best For | Full Tutorial |
|---|---|---|
| All-Purpose / Zigzag Foot | General sewing, straight and zigzag stitches — your everyday foot | The Basic Sewing Machine Presser Feet |
| Walking Foot | Quilts, knits, denim, and layered fabrics that shift or slip | How to Use a Walking Foot |
| Gathering Foot | Ruffles, gathers, and shirring without hand-gathering | How to Use a Gathering Foot |
| Zipper Foot (All-Purpose) | Standard zippers, adjustable for either side | Types of Sewing Machine Zipper Feet |
| Invisible Zipper Foot | Concealed/invisible zippers | Types of Sewing Machine Zipper Feet |
| Buttonhole Foot (1-step or 4-step) | Buttonholes | The Basic Sewing Machine Presser Feet |
| Blind Hem Foot | Invisible, professional-looking hems | The Basic Sewing Machine Presser Feet |
| Overlocking / Overcasting Foot | Finishing raw edges to prevent fraying | The Basic Sewing Machine Presser Feet |
| Rolled Hem Foot | Narrow, delicate rolled hems on lightweight fabric | Rolled Hem Foot Guide |
| Candlewicking Foot | Decorative knot-stitch designs | Candlewicking Foot Guide |
Bookmark this chart! Not every foot listed here will be available for every machine, but most of these are available for the vast majority of home sewing machines.
The Feet Most Beginners Start With
If you’re new to sewing, you don’t need every foot in this chart right away. Start with these:
All-Purpose (Zigzag) Foot — This is almost certainly the foot already on your machine. It has a wide needle opening that fits your widest stitch, and you’ll use it for most general sewing.
Zipper Foot — Narrow on one or both sides so your needle can stitch close to the zipper teeth. Essential the first time you sew in a zipper.
Blind Hem Foot — Has a guide that runs along the folded edge of your fabric, catching just a small thread of fabric so your hem stitching stays nearly invisible from the outside.
Buttonhole Foot — Comes in two styles: a 4-step foot, where you measure and sew the buttonhole in four stages, or a 1-step (automatic) foot, which measures your button and sews the entire buttonhole in one pass.
Once you’re comfortable with these, you’ll have a solid foundation for tackling most beginner and intermediate projects.
💡 Want a structured way to build these skills? My Sewing 101 course walks you through your machine, essential techniques, and yes — how and when to use these exact presser feet — with guidance the whole way through. Learn more about Sewing 101 →
Specialty Feet Worth Knowing About
Once you’re comfortable with the basics, these feet open up techniques that would otherwise be slow, fiddly, or require hand-sewing:
Walking Foot — Feeds the top and bottom layers of fabric evenly at the same time, which prevents shifting and puckering. A must-have for quilting, knits, denim, and matching plaids.
Gathering Foot — Automatically gathers fabric as it feeds through the machine, saving you from hand-gathering with a needle and thread. Great for ruffles, shirring, and gathered skirts.
Rolled Hem Foot — Curls and rolls a narrow hem as you sew, giving lightweight fabrics like chiffon and voile a clean, delicate finish without hand-pressing each fold.
Invisible Zipper Foot — Has grooves on the underside that guide the zipper coil out of the way, letting you stitch close enough to fully conceal the zipper teeth.
Overlocking/Overcasting Foot — Finishes raw seam edges to prevent fraying, without needing a separate serger.
Candlewicking Foot — Designed for decorative knot-stitch embroidery techniques, popular for heirloom and quilted projects.
How to Change Your Sewing Machine Foot
Switching feet takes less than a minute once you know the steps:
- Raise the needle to its highest position by turning the hand-wheel toward you
- Raise the presser foot lever
- Release the current foot by lifting the small lever at the back of the foot holder
- Position the new foot under the shank and lower the lever to snap it into place
For a full visual walkthrough, see How to Change Out the Feet on Your Sewing Machine.
You Don’t Need Every Foot to Start Sewing Well
It’s easy to look at a chart like this and feel like you need to own every single foot before you can really sew. You don’t.
Start with your all-purpose foot, add a zipper foot and blind hem foot as you take on those techniques, and build your collection from there as your projects call for it. Most sewists add specialty feet gradually, over years, not all at once.
💡 Want help figuring out exactly which skills — and which feet — to focus on first? That’s exactly what I walk you through, step by step, inside Sewing 101. No guessing which attachment you actually need. Start Learning with Sewing 101 →
Have a specific sewing machine foot or attachment you’d like covered in more depth? Leave a comment below and I’ll add it to my list of upcoming tutorials!

I am fascinated with your range of presser feet. I love sewing and I love to know how to fix them and sew Do you send goods to Sri Lanka?
Very helpful to learn more about the various feet that come with a ‘new to me’ sewing machine. I love it but a variety of the feet that came with it are not in the online manual I found for the original machine which was built in 1986 at the latest. It works really well and I love it. My other machine that I have used for 35 years was built in around 195_ is only straight stitch but I have made it work creatively (no zigzag so I’ve used flat felt and French seams to finish edges). It is a smallish machine with a needle that threads from the side and a bobbin that sits on its side (unlike so many that lay flat). It can sew through about 6 layers of denim as found on the hem of jeans. That’s why I love it and lived with a ‘straight stitch only’ stitch machine for so long.
Thanks again,
Chris