In this article, I will show you how to take in pantlegs. Making pants slimmer in the leg is a great way to give your pants a tailored look. This post covers pants that are already constructed. I’ll cover altering pants patterns in another post.
You’ll want to make sure you are using your sewing machine and not a serger for this. Most sergers are not strong enough to sew the seam on denim pants. If you have a heavy-duty serger don’t serge the seam until you are sure you have a good fit.
Supplies to Take in Pantlegs
- Pants that need adjusted
- Tape Measure
- Ruler or straight edge ruler
- Sewing Machine Needle (Heavey duty if working with denim)
- Heavy duty thread that matches the fabric
- Sewing machine
- Scissors
- Pins are optional
Determining How Much to Taper the Pantlegs
Before you can taper the pantlegs, you will need to determine how much the pantlegs need to be taken in. If the pants are new and have not been washed or dry cleaned, you will need to do so. Prewashing ensures that the pants won’t shrink after you take them in. There are two basic ways to determine how much to taper the legs. I’ll cover both, but my preferred method is to use a pair of pants that fit well to do a “rub-off.”
Use a pair of pants that fit to determine how much to taper
The easiest way is to do a “rub-off” from a pair of pants that already fit the way you want. You will be replicating the fit of the pants that fit onto the pants that need to be taken in.
Use measurements to determine how much to taper.
If you don’t have a pair that fits the way you want, you’ll use measurements. It is easier for the measurement method to have someone that can help you.
Avoiding Puckering or Noticeable Alteration Lines
To avoid puckers or noticeable alteration lines, mark your desired seam on the inside of the leg. Start around the mid-thigh area and slowly create the taper. Your alterations will be less noticeable in this location than if you sew the outside of the leg.
Mark the Desired Seam
Follow the steps below if you use a pair of pants that fits as a guide. You will be replicating the fit of the pants that fit on the pants you are taking in.
- Turn the pants inside out.
- Lay the properly fitting pants on top of the pair you are slimming.
- Line up the crotch and outside leg seams.
- Trace the skinnier pants’ leg onto the pants you are taking in.
- Hold the ruler against the line and correct crooked spots with the chalk. You can also use a ruler to help you check the distance from the edge of the pants to the lines. This will help to ensure that the right and left legs are the same size.
Follow the steps below if you are using measurements
- Turn the pants inside out.
- Put on the trousers if you want to taper them for yourself, or have the person you are tapering the pants for put them on.
- Pinch the edges of the pants where you want to taper them
- Have a helper draw along the inside of where you are pinching the pantlegs. You can try to mark the fabric yourself, but keep in mind that you will still need to pinch it while you mark it to get the best results.
- If you don’t have anyone to help you by drawing a line where you are pinching, you can also insert pins into the areas where you want to taper the pant legs. Insert a pin about every 1 to 2 inches (2.5 to 5.1 cm) where you want to taper the pants.
- After removing the pants, draw a chalk line along the pins’ inner edges.
- Hold the ruler against the line and go over any crooked spots with the chalk. You can also use a ruler to help you check the distance from the edge of the pants to the lines. This will help to ensure that the right and left legs are the same size.
Remove the Original Seam Stitches
If you remove the original seam, the pants will be easier to work with. Use a seam ripper to remove the stitches from the original seam. You don’t have to remove all of the stitches if you are not tapering the whole leg. Just remove stitches where you want to take in the seam. It is best to start around the mid-thigh area. After you remove the stitches, if the pantleg is not laying flat, press the pant leg.
Pin the Fabric Together
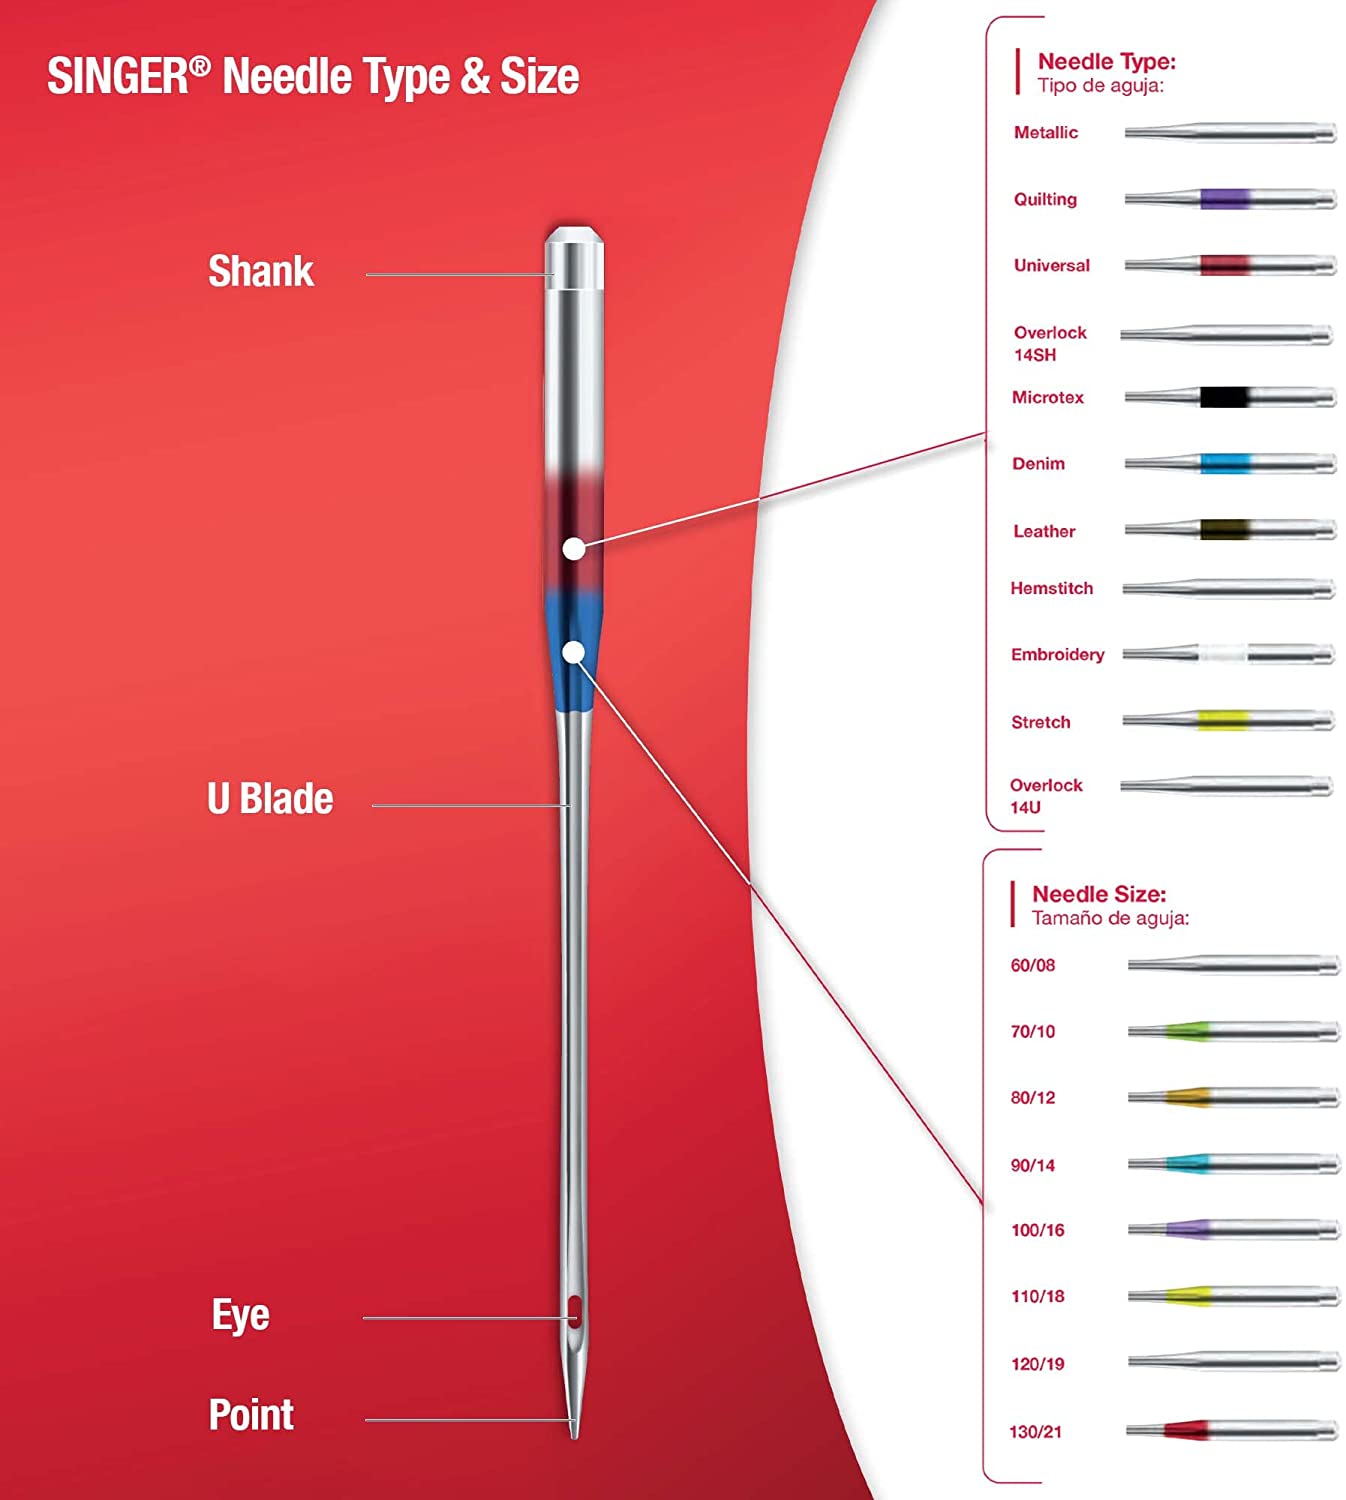
Use the Proper Needle and Thread
Make sure you use the appropriate needle and thread in your sewing machine. (Denim usually requires a heavyweight needle made for denim.) If you are unsure how to choose the correct needle, we have an article explaining how to choose the correct sewing machine needle.
Choose a thread that works well with the type of fabric the pants are made from. Just like with the needle, you will need to use a heavy-weight thread made for denim if you take in the pants on jeans.
Baste a Temporary Seam
If you don’t like pulling out stitches and starting over I’d suggest you stitch the pants with a basting stitch (increase the stitch length) first. The longer stitch length will make the stitches easier to remove. We have a detailed article covering the top 10 sewing machine stitches if you’re unsure how to sew a basting stitch on your sewing machine.
- Stitch using a basting stitch
- Try the pants on (see the section below on checking the fit)
- Make adjustments if needed
- Stitch the pants using a reinforced stitch after you are sure the fit is correct.
- Remove the basting stitch.
Check the Fit
After sewing, try the pants on. You should still be able to walk around easily. Bend over, jump up and down and bend your legs. Move around the house in the pants for at least 30 minutes to make sure you are happy with the fit. Make any adjustments before trimming the excess fabric.
Trim the Seams to Remove Excess Fabric
Once you have the fit you want, the excess fabric in the seam will need to be removed. To prevent the seams from falling apart (too small of a seam allowance) and to ensure you have room to finish the seam cleanly leave at least about 3/4″ of the seam allowance. If you leave too much of a seam allowance the excess fabric will rub against your legs and create a bulky look on the legs.
Finishing the Seams
I have an article and video that shows you several options for finishing seams and raw edges. Pinking shears are the easiest way to finish most pant fabrics if you don’t have a heavy-duty serger. Another option is to sew down the side of each seam with an overcast stitch or a narrow zig-zag stitch. Once the seams have been finished your tailored pants are ready to wear!
Increase Your Sewing Knowledge
If you’re looking for detailed sewing and pattern-making videos, visit our YouTube Channel. If you’d like to join a group filled with other sewing enthusiasts, join our free Facebook Group.