• Bloglovin
  • Facebook
  • Instagram
  • Pinterest
  • YouTube
  • Skip to primary navigation
  • Skip to main content
  • Skip to primary sidebar
  • Skip to footer
Let's Learn To Sew
  • Home
  • Blog
  • Start Here
  • Sewing Basics
    • Sew Alongs
    • Pattern Making Basics
  • Online Workshops
    • Free Sewing Machine Boot Camp
    • Sewing 101
    • Sewing 101 For Kids
    • Serger 101
  • Sewing Patterns & Supplies
    • Resources
menu icon
go to homepage
search icon
Homepage link
  • Join Our Community
×

How to Use A Jean-A-Ma-Jig or Hump Jumper

January 15, 2021 by Margaret Leave a Comment

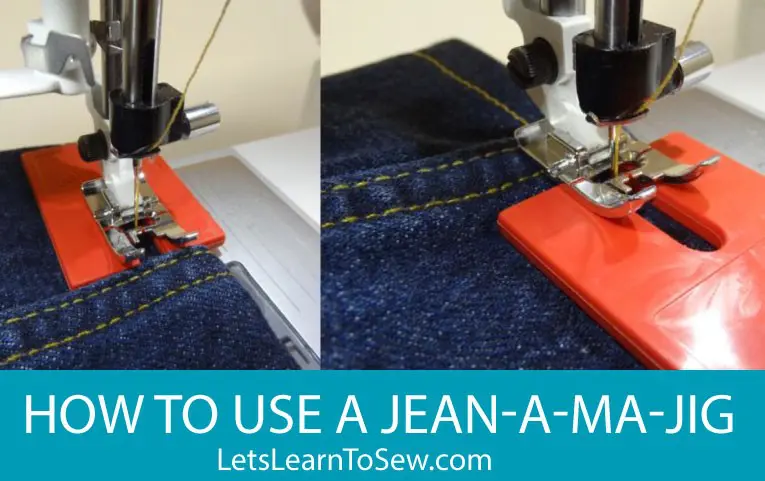
Broken needles, difficult seams, skipped stitches and crooked top-stitching are a few of the challenges that keep sewists from sewing with thick fabric. While thick fabrics come with their own set of challenges with a jean-a-ma-jig or hump jumper sewing over seams doesn't have to be one! Learning How to Use A Jean-A-Ma-Jig or Hump Jumper is quick and easy. I bet after you use it a few times you'll no longer fear thick fabric and seams.

What is a Jean-A-Ma-Jig or Hump Jumper

Use the Jean-A-Ma-Jig in the back or in front of your sewing machine's presser foot for heavy-duty sewing.

  • For topstitching and machine hemming over thick seams
  • Use on jeans, jackets, towels, quilts, upholstery, and home dec projects
  • Can be used with any sewing machine
  • Prevents skipped stitches & broken needles
  • Hem jeans quickly & easily

How to Use A Jean-A-Ma-Jig or Hump Jumper

1. Press and pin jean hems.

2. Begin stitching - stopping ¾ inch before thick seam. With the needle in the down position - raise the presser foot.

3. From back of presser foot - slide Jean-a-ma-jig up to thick seam allowance - lower presser foot.

4. Slowly stitch across the seam and off jean-a-ma-jig. With the needle in the down position - raise the presser foot and remove Jean-a-ma-jig.

5. Move Jean-a-ma-jig to the front of the presser foot.

6. Lower the presser foot and continue stitching onto Jean-a-ma-jig.

7. Stop when completely on Jean-a-ma-jig and lower the needle into the fabric. Raise the presser foot and remove jean-a-ma-jig. Continue sewing.

More basic sewing articles can be found under Sewing 101: Sewing Basics.

Related Posts:

  • How To Use An Automatic Needle Threader
    How To Use An Automatic Needle Threader
  • How To Use a Magnetic Seam Guide
    How To Use a Magnetic Seam Guide
  • How To Use The Edge Joining Foot
    How To Use The Edge Joining Foot
  • Fabric 101: Understanding Fabric Types, Structure, and Use
    Fabric 101: Understanding Fabric Types, Structure, and Use
« How To Thread A Sewing Machine and Wind A Bobbin
How to Use a Sewing Machine Gathering Foot »

Reader Interactions

Leave a Reply Cancel reply

Your email address will not be published. Required fields are marked *

This site uses Akismet to reduce spam. Learn how your comment data is processed.

Primary Sidebar

Start Here Sewing Basics Serger Basics Resources Pattern Testers Online Workshops Pattern Making Basics Sew Your Own Wardrobe Alterations Mending & Repairing

Recent Posts

  • How to use Double-sided Fusible Tape
  • How to Join and Pattern Match Fabric
  • How to Sew a Christmas Stocking
  • Top 5 Mistakes To Avoid Before Cutting Fabric
  • A Quick and Easy Guide To Sewing a French Seam

Footer

  • Bloglovin
  • Facebook
  • Instagram
  • Pinterest
  • YouTube
  • About Me
  • Affiliate Program
  • Copyright, Disclaimer, and Disclosure

© 2023 Let's Learn to Sew· Log in