Zippers can feel super intimidating to beginner sewers, but they’re actually pretty easy to pull off, and some are easier to insert than others. In this article, I'm going to show you how to sew an invisible zipper. When you add one, there’s no machine stitching visible from the right side of the project. Everything is done behind the scenes, totally concealed within the seam allowances. Of all of the zippers, I think the invisible zipper is one of the easier ones to sew once you learn how!
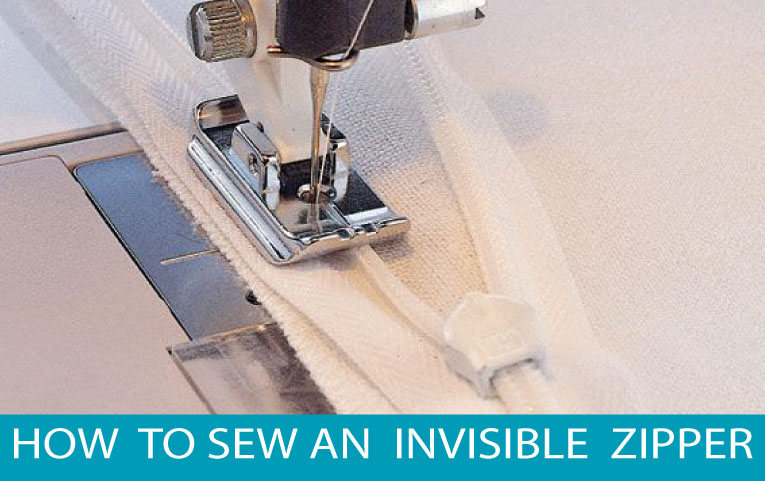
The Invisible Zipper Foot
The invisible zipper foot will have two deep grooves on the underside of the foot which the teeth of the invisible zipper are fed. In the center of the foot is a small hole for the needle. Invisible zipper feet come in metal or clear, I prefer the clear ones. I've been using the same one for 15 years and it is holding up fine.
How An Invisible Zipper Foot Works
A regular zipper foot sits next to the raised zipper teeth but an invisible zipper foot does not. An invisible zipper foots has deep grooves that sit over the zipper and the teeth run through on of the two groves depending on the side you are sewing.
When you stitch the zipper in place you need to have the needle in the center position. This will ensure you don't break a needle and that the stitches will be formed as close as possible to the zipper teeth. Amazon and most fabric and craft stores carry universal invisible zipper feet.
Let's Learn How to Sew an Invisible Zipper
Invisible or concealed zippers are the perfect zipper choice for skirts and dresses. Inserted into the seam along the center back or side seam, they provide an invisible closure as no stitching shows on the right side of the garment.
What You Need
- Sewing machine
- Invisible zipper foot
- Fabric marker or pins
- Ruler or seam gauge
- Straight Pins
- Iron
- Clear Tape or fusible webbing is optional
- The project that needs the zipper inserted or two pieces of fabric if you are practicing.
Instructions for Inserting an Invisible Zipper
The instructions for an invisible zipper are different from all other zippers. The tips I'm sharing below will help you easily install an invisible zipper while giving the finished project professional-looking results.
Prepare the invisible zipper
Insert this zipper before sewing the garment seam. First, unzip the zipper and press the coils as flat as possible with cool iron, and don’t close the zipper again until after inserting it. Be sure to press with a low setting. Too high of heat can melt the zipper teeth. The suggested setting is usually the synthetic fabric setting.
Prepare the Seam Edges
Finishing the raw edges of your fabric may seem optional to many but it really is important for many reasons. It won't take much longer and the finished garment will be better. After finishing the raw edges of the fabric Mark ¾” from the top edges of both pieces. This indicates the placement of the zipper and ensures that both sides of the joined pieces align perfectly.
Mark the Seam Allowance
Many sewists find it helpful to mark the seam allowance when sewing an invisible zipper. To mark the seam allowance mark a ⅝” vertical seam allowance where the invisible zipper will be placed. If you don't want to mark it with a fabric marker you can fold it back ⅝" and press the fabric. The crease will work as the marking line. If you do not mark it in some way you will need to measure as you pin the zipper into place.
Pin One Side of the Zipper
Pinning is optional but if you are new to sewing or don't want to take any chances I highly suggest you go ahead and pin the zipper in place unless the fabric should not be pinned. In that case, you can use clear tape, fusible webbing, or baste the zipper into place.
Pin the right side of the zipper to the right side of the fabric. This means that the zipper coil should be right side down along one of the marked ⅝” seam allowances. Now pin the zipper in place. It probably looks odd and you may be wondering if you have it right. The zipper pull should face down if you have this placed correctly.
Only use enough pins to hold the fabric in place to ensure it will not shift and is stable. Fewer pins are usually best when it comes to most sewing projects.
Sewing Down One Side of the Zipper
Finally, we are sewing! Stitch down each side of the invisible zipper with coils along the seamline, right sides of the zipper tape, and fabric together. Double-check the zipper coils are rolled out and flat, then position the zipper teeth under the proper groove in the invisible zipper foot. Start at the top edge and stitch in place until the foot reaches the zipper stop. If you pinned the zipper in place make sure you remove the pins as you come to them, never sew over pins. Backstitch to lock and remove.
Pin the Other Side of the Zipper
It is important that the ¾“ markings along the top edge of each pattern piece are aligned with one another. Otherwise, the zipper will be sewn in uneven. Adjust and re-pin if necessary.
Sew the Other Side of the Zipper
Sew the zipper to the other side of the pattern piece. Remember to make sure the zipper coils are rolled out and lay flat, then position the zipper teeth under the proper groove in the foot. Start at the top edge and stitch in place until the foot reaches the zipper stop. Backstitch to lock and remove. Again, if you pinned the zipper in place make sure you remove the pins as you come to them, never sew over pins.
Finish the Seam Below the Zipper
Close the zipper. Place right sides of the fabric together and move the zipper tails out of the way. Place the project into your sewing machine; lower the needle as close to the last stitching line as possible. Lower the foot and stitch away from the zipper for about 2”.
When sewing seams, remember to backstitch at both the beginning and end so it stays secure.
Complete the Seam
Attach the regular presser foot to your sewing machine and sew the seam on the project following the last stitching line.
Zipper Care
To keep your finished project looking great and to protect the zipper make sure you keep the zipper closed when washing or dry cleaning.
Are you looking to master more sewing machine feet? You can find an ever-growing list of articles and videos under Sewing Machine Feet.




Leave a Reply