How to Insert a Lapped Zipper the Easy Way
A lapped zipper gives a tailored look. Only one line of stitching shows on the right side of the fabric. It’s easier to keep the stitching straight and to make sure the zipper teeth are completely covered. A lapped zipper application uses a traditional zipper but the zipper is hidden with a lap of fabric that is topstitched in place. I’ve never understood why most commercial patterns provide for a centered zipper when installing one attractively is so challenging.
When to Use
The lapped zipper is sometimes called a concealed zipper which is why it is often used on side fastening pants and on skirts. Make sure that the lap of the zipper sweeps over toward the back of the garment for a smooth finish.
Lapped Zipper Application
The first skirt in our skirt series uses a lapped zipper in the center-back seam so that’s what I’ll be illustrating in this post but the process is the same when inserted in another area.
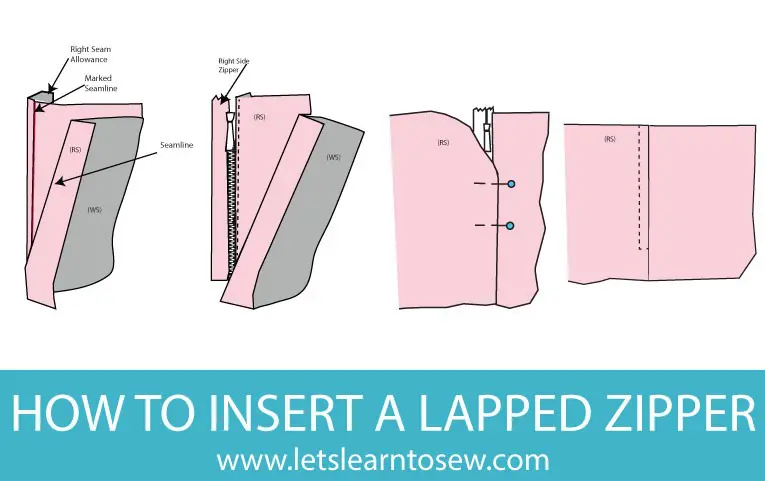
- Machine-stitch the garment opening below the zipper opening with the right side together.
- Press the right seam allowance under 5/8″ to the wrong side of the fabric. I like to use the Dritz EZY Hem but a seam gauge or ruler can be used.
- Press the left seam allowance under 1/2″ to the wrong side of the fabric.
- Attach the left side of the zipper tape to the left side of the skirt opening. Attach it using either pins or seam tape. The edge of the zipper teeth should be close to the fold of the skirt opening.
- Install the zipper foot. Edgestitch close to the zipper teeth/coils.
- To check your lap pin the garment closed so that the right folded edge creates a lap and the seamlines are aligned.
- Using either fabric chalk or a fabric pen mark the stitch line for the right side of the skirt. The line should be 1/2″ away from the right fold. Mark from the top of the waistband to just before the zipper stop.
- Topstitch the zipper in place following the line you drew, pivoting across the bottom of the zipper. Stop right at the seam.
- Trim any thread tails and give the skirt a good press with the iron.
Tip: It’s easier to stitch straight along the outside of the lapped zipper if you mark the stitch line with a temporary fabric marker before sewing.
If you have any questions let me know in the comments section or let me know in the private Facebook group.


Thank you for the written info on the lap zipper, but for some people as myself, being more of a visual soul, I would enjoy seeing a video on that. Thank you
I’m almost done editing the video. It should be up sometime tomorrow.